RSS

Category Archives: SharePoint

Advance paging in SharePoint 2010 using Client Object Model and jQuery


In this tutorial I will show you new way of creating custom paging that work with SharePoint 2010 or SharePoint 2013 by using Cleint Object Model and jQuery.

Demo

Description

This demo is using custom paging approach but I’m injecting data on same page instead of navigating between pages by using jQuery.

Note: This code should work not only on lists but it can work with any different data source like document library ,Image Library and so on

Advantages

The are many advantages of this Advance Custom paging as follow

  • Work great with large lists because you do not need to navigate between pages.
  • It’s javascript which means is cleint side ,so need for post back each unlike standard custom paging.
  • Clean HTML tags because I’m using Table- less table by using DIV tag

Prerequisites

To run this code properly you need the following

  • Create Custom List and name it “Products”
  • Create New Cloumn in Products list and name it Company,so you have now two column Title and Company
  • Try to fill Products list with some data
  • How it work

    The idea is sample ,you just need to work with SharePoint Client Object Model but the most important thing to note is ListItemCollectionPosition and row limit as well.

     <script>
    var listItems;
    var query;
    var targetList;
    var clientContext;
    
    function LoadData() {
    
    $('#divPostsLoader').html('<img src="../../../_layouts/Images/AdvancePaging/ajax-loader.gif">');
    clientContext = new SP.ClientContext();
    targetList = clientContext.get_web().get_lists().getByTitle('Products');
    query = new SP.CamlQuery();
    var RowCount = 3;
    //Specifying the RowLimit will determine how many items will be fetched in one call to the server.
    query.set_viewXml("<View><RowLimit>"+RowCount+"</RowLimit></View>");
    listItems = targetList.getItems(query);
    clientContext.load(listItems);
    clientContext.executeQueryAsync(Function.createDelegate(this, this.onQuerySucceeded), Function.createDelegate(this, this.onQueryFailed));
    }
    
    function onQuerySucceeded() {
    
    var title, company;
    var listEnumerator = listItems.getEnumerator();
    //Create Header
    $("#Result").append("<div class='div-table-row'><div class='div-table-col'>Title</div><div class='div-table-col'>Name</div>");
    $("#divPostsLoader").empty();
    while (listEnumerator.moveNext()) {
    title = listEnumerator.get_current().get_item("Title");
    company = listEnumerator.get_current().get_item("Company");
    //Create tableless using DIV
    $('#Result').append("<div class='div-table-row'>");
    $('#Result').append("<div class='div-table-col'>" + title + "</div><div class='div-table-col'>" + company + "</div>");
    $('#Result').append("</div>");
    }
    }
    
    function onQueryFailed(sender, args) {
    alert('Request failed. \nError: ' + args.get_message() + '\nStackTrace: ' + args.get_stackTrace());
    }
    
    //Call the function after the sp.js is loaded.
    ExecuteOrDelayUntilScriptLoaded(LoadData, "sp.js");
    function loadMoreData() {
    $('#divPostsLoader').html('<img src="../../../_layouts/Images/AdvancePaging/ajax-loader.gif">');
    
    //Gets the id of the last element from the returned collection along with the query.
    var position = listItems.get_listItemCollectionPosition();
    
    if (position != null) {
    $("#LoadBtn").attr("disabled", "disabled");
    query.set_listItemCollectionPosition(position);
    listItems = targetList.getItems(query);
    clientContext.load(listItems);
    //Call the other function to load  data from list
    clientContext.executeQueryAsync(Function.createDelegate(this, this.onLoadQuerySucceeded), Function.createDelegate(this, this.onQueryFailed));
    }
    else {
    $('#divPostsLoader').empty();
    $("#LoadBtn").attr("value", "No more data found");
    $("#LoadBtn").attr("disabled", "disabled");
    }
    }
    function onLoadQuerySucceeded() {
    var title, company;
    var listEnumerator = listItems.getEnumerator();
    while (listEnumerator.moveNext()) {
    title = listEnumerator.get_current().get_item("Title");
    company = listEnumerator.get_current().get_item("Company");
    $("#divPostsLoader").empty();
    //Create tableless using DIV
    $('#Result').append("<div class='div-table-row'>");
    $('#Result').append("<div class='div-table-col'>" + title + "</div><div class='div-table-col'>" + company + "</div>");
    $('#Result').append("</div>");
    }
    $("#LoadBtn").removeAttr("disabled");
    
    }
    
    </script>
    

    as you can see you need to specify the row list (3,4,..etc) then loading data.After that when you click the button it will return next rows and so on until position equal null.

    Source Code

    The Source code of this article can be found on the following link
    http://code.msdn.microsoft.com/Advance-paging-in-81934f2b

 
1 Comment

Posted by on September 29, 2012 in jquery, SharePoint


Tags: , , , , , , , ,

How to connect to the Oracle database using Business Connectivity Services (BCS) in SharePoint 2010


In this Step by Step article I will show you how to connect to the oracle database using BCS.

Note: Before we start I will assume that you are already have running and working oracle database.

Prerequisites

Table Name: Orders

Column Name Type Primary Key
Order_ID Number (5) Yes
Order_Name Varchar 2 (50) No
  • Add oracle connection string in tnsnames.ora as following

Go to C: or D: –>App-> Your User Name->product->11.2.0->client_1->Network->Admin.

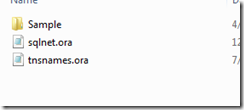
after going to Admin folder you will find to files (sqlnet.ora,tnsnames.ora)image

Note:if you did not find those files go to sample folder and copy both files and past it in Admin Folder.

  • Now open tnasnames.ora file and add connection string of your oracle DataBase similar to the following syntax

image

Creating a BCS External Content Type

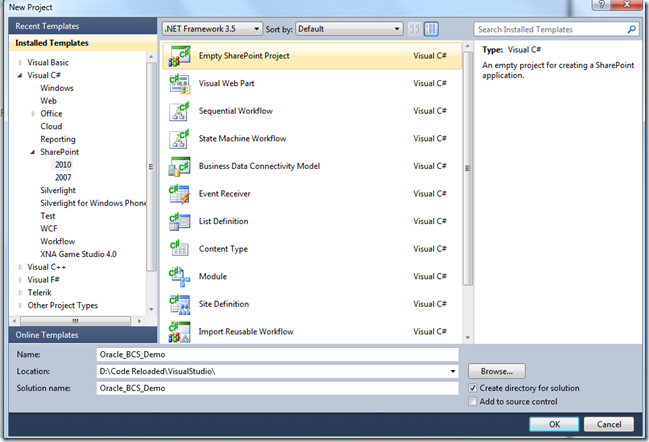
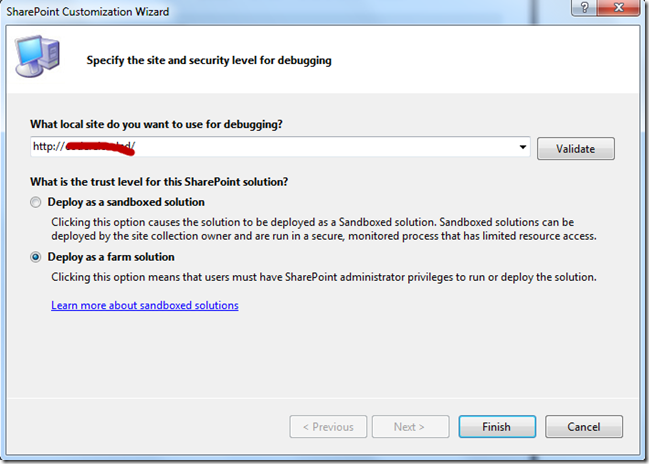
1- Open Visual Studio and create new sharepoint 2010 project as following and select Deploy as a farm solution

image

image

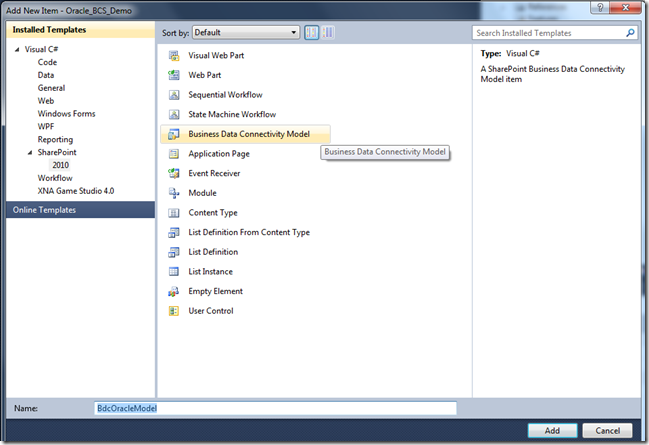
2- After Creating project add new SharePoint Item (SPI) with type Business Data Connectivity Modelimage

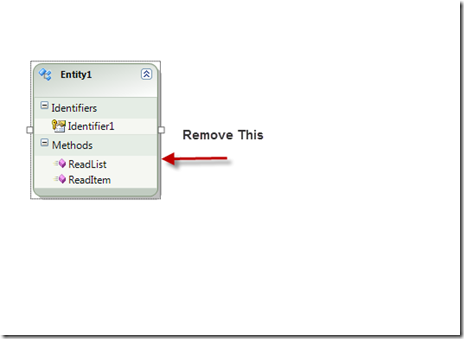
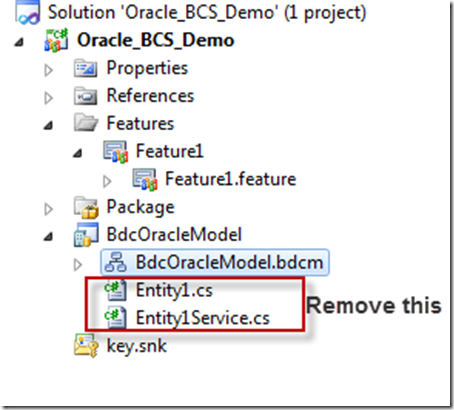
3-Now Remove Entity1, Entity1.cs and Entity1Service.cs

image

image

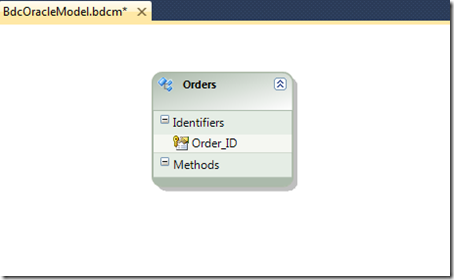
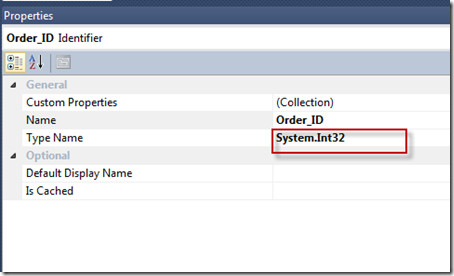
4-Now add new Entity with Orders Name and add identifier with Order_ID name and type System.Int32

image

image

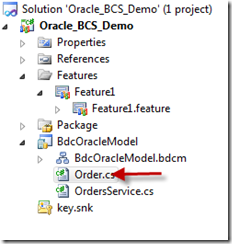
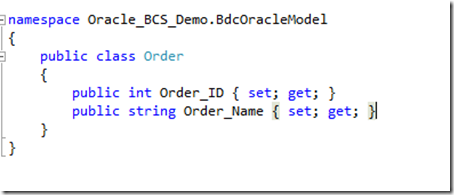
5- Create New class with Order Name

image

6- Open Order.cs and the following code

image

7- Add Oracle.DataAccess.dll reference from the following path

D:\app\yourusername\product\11.2.0\client_1\odp.net\bin\2.x

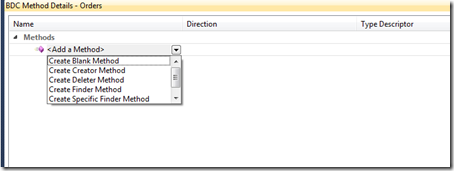
8- Now it’s time to Create Method for insert,update,delete,retrive.

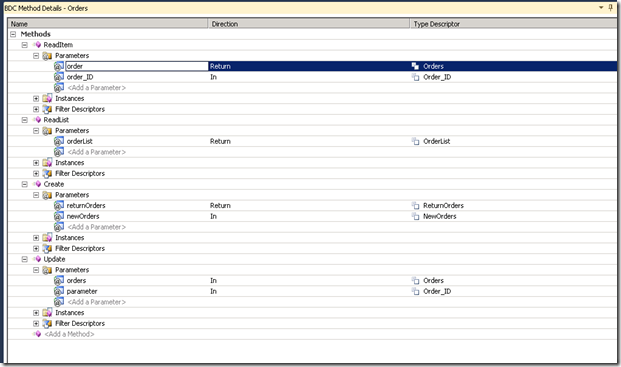
9-Click on Order Entity on BDC Diagram and add the following Methods.
image

10- now the BDC will be looking to the following diagram

image

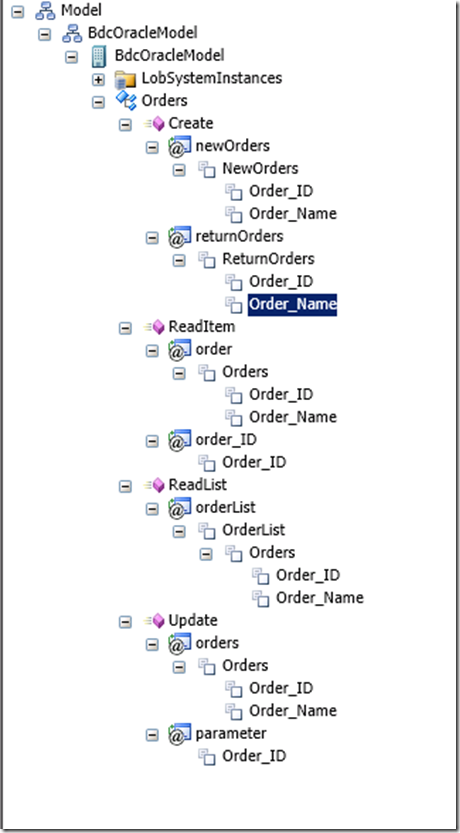
11- Now Go to BDC explorer to make sure the Orders identity have the correct Type descriptors for each method as following

image

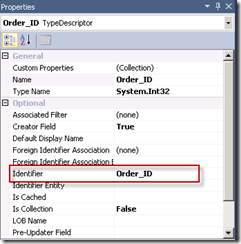
Note: Make sure to set identifier property  for each Order_ID on each method to Order_ID identifier

image

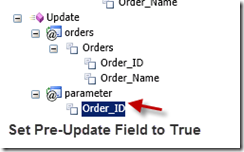
Note:For Update Method you need to set Pre-Update Field prperty to True for Order_ID in parameter section.

image

12- Open Order.cs and write the following code .


public partial class OrdersService
{
static string connectionString = "Data Source=dotnetfinder;User ID=ahmed; Password=sharepoint";
public static Orders ReadItem(int order_ID)
{

Orders SelectedOrder=new Orders();;
using (OracleConnection connection = new OracleConnection(connectionString))
{
OracleCommand cmd = new OracleCommand("select * from orders where order_id=:order_id", connection);

connection.Open();
cmd.Parameters.Add(":order_id", order_ID);
OracleDataReader Reader = cmd.ExecuteReader();
while (Reader.Read())
{
SelectedOrder.Order_ID = Convert.ToInt32(Reader["Order_ID"]);
SelectedOrder.Order_Name = Reader["Order_Name"].ToString();
}
}
return SelectedOrder;
}

public static IEnumerable<Orders> ReadList()
{

List<Orders> OrderList = new List<Orders>();
using (OracleConnection connection = new OracleConnection(connectionString))
{
OracleCommand cmd = new OracleCommand("select * from orders", connection);
connection.Open();
OracleDataReader Reader = cmd.ExecuteReader();
while (Reader.Read())
{
Orders SelectedOrder = new Orders();
SelectedOrder.Order_ID = Convert.ToInt32(Reader["Order_ID"]);
SelectedOrder.Order_Name = Reader["Order_Name"].ToString();
OrderList.Add(SelectedOrder);
}
}
return OrderList;
}

public static Orders Create(Orders newOrders)
{

using (OracleConnection connection = new OracleConnection(connectionString))
{
OracleCommand cmd = new OracleCommand("insert into orders (order_id,order_name) values (:order_id,:order_name)", connection);
connection.Open();
cmd.Parameters.Add(":order_id", newOrders.Order_ID);
cmd.Parameters.Add(":order_name", newOrders.Order_Name);

cmd.ExecuteNonQuery();
}
return newOrders;
}

public static void Update(Orders orders, int parameter)
{

using (OracleConnection connection = new OracleConnection(connectionString))
{

OracleCommand cmd = new OracleCommand(string.Format("update orders set order_name=:order_name where order_id={0}",parameter), connection);
connection.Open();

cmd.Parameters.Add(":order_name", orders.Order_Name);

cmd.ExecuteNonQuery();
}
}
}

13-Deploy your solution Now and create New External List and pick up our external content type that we have created in this article

Configure Business Data Connectivity access rights:

1. Go to Central Administration -> Application Management -> Manage Service Applications.

17

2. Click on Business Data Connectivity Service.

3. In the top Ribbon click on Manage.
4. In Service Application Information check the External Content Type Orders

5. In the top Ribbon click the Site Object Permissions.

6. Site Object Permissions wizard will pop up add the account (Group or Users) and assign the permissions.

Creating an External List in the SharePoint Site:

1. Open the SharePoint Site.

2. Go to Site Actions => More Options.
3. On the Create Wizard, from the Installed Templates Select List.

4. In the List Type select External List and click Create.

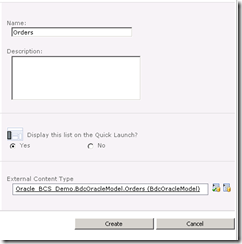
5. Enter the Name as BCS for OracleDB and choose the External Content Type as shown below.

image

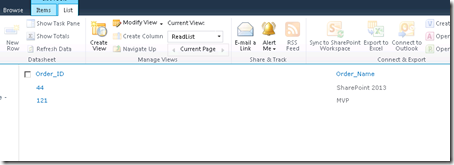
6-Now you can find the external list with data populated from Oracle Database

image

Try now to Create,Update,Delete and Retrieve items and Every Thing should work fine Open-mouthed smile

You can download Source Code from here

 
1 Comment

Posted by on August 27, 2012 in C#, SharePoint, VB.NET


Tags: , , , , , , , ,

SharePoint 2010 Twitter Web Part


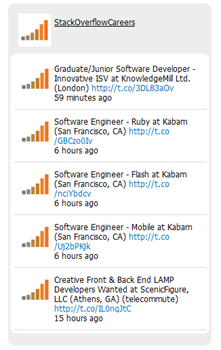
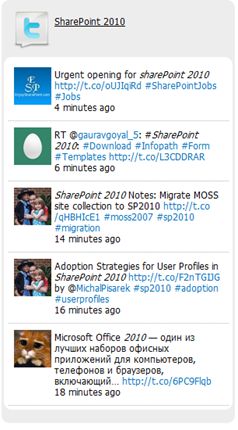
It’s been a while time since my last post here.Today I’m going to talk about Building Twitter web part in SharePoint 2010 as seen below.

image

Note:Before you start you can download code from here ( Please do not forget to rate it)

SharePoint 2010 Twitter Web Part

SharePoint 2010 Twitter Web Part Features

  • Allow you to display Profile or search with include replies and include retweets when you select Profile mode
  • you can specify numbers of tweets or status(1,2,..etc)
  • The Status will be updated during specific time(10,15,30,45,16) asynchronously (no need to refresh page).
  • It’s Free Open-mouthed smile

Twitter Web Parts important things to know

1- Define and pass custom parameters to Visual web part.

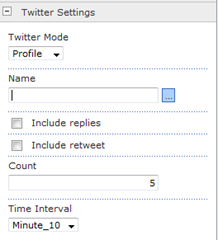
if you look to the following image you will see that I’m using custom properties to initialize web part,this is easy in normal web part but not in visual web part

image

To get rid this issue you need to follow this steps

  • Open your web part class that inherits from ASP,Net WebPart class
  • Add custom properties let say Profile
public class TwitterWepPart : WebPart
{
public enum TwitterMode
{
Profile,
Search
}
[DefaultValue(TwitterMode.Profile)]
[Description("Select a category from the dropdown list.")]
[WebDisplayName("Twitter Mode")]
[WebBrowsable(true)]
[Personalizable(PersonalizationScope.User)]
[Category("Twitter Settings")]
public TwitterMode Mode
{
get;
set;
}

……

}

as you can see I’m using Enum to display the value in DropDown List

  • After Defining the whole custom properties you need to define a property of TwitterWebPart in user control
public partial class TwitterWepPartUserControl : UserControl
{

public TwitterWepPart PropertiesWebPart;

…….

}
  • The final step is to pass the custom properties within CreateChildControls method
public class TwitterWepPart : WebPart
{

…..

// Visual Studio might automatically update this path when you change the Visual Web Part project item.
private const string _ascxPath = @"~/_CONTROLTEMPLATES/SPTwitter/TwitterWebPart/TwitterWebPartUserControl.ascx";

protected override void CreateChildControls()
{
TwitterWebPartUserControl control = Page.LoadControl(_ascxPath) as TwitterWebPartUserControl;
control.PropertiesWebPart = this;
Controls.Add(control);
}

}

….

}

As you can see  Page.LoadControl is used to load the control of type Control but in our case we want LoadControl to return TwitterWebUserControl instead of Control,so we can read the values of Custom Properties of this web part from usercontrol.

var Tweets = GetProfile(PropertiesWebPart.Name, PropertiesWebPart.Count, PropertiesWebPart.Retweet, PropertiesWebPart.Replies);

We are able now read value from Custom Properties like count,including Retweets ..etc,

2- Using Twitter API to display the results

For user Mode you need to pass the following parameters to twitter

  • User name with or without @
  • Number of status to display
  • Include Replies (optional)
  • Include Retweets (Optional)

you will then Create Get request as following

http://api.twitter.com/1/statuses/user_timeline.xml?screen_name=amdnaji&count=5&include_rts=1&exclude_replies=1

For Search Mode you only need the following Parameters

  • Search Name
  • Number of status to display

The request will be like this

http://search.twitter.com/search.atom?q=ajax&rpp=5

Start working on web part

1- Open the project on Visual studio 2010 –>Deploy

Note:You need to change Site Url before deploy web part.

2- Open your site then add web part to the page.

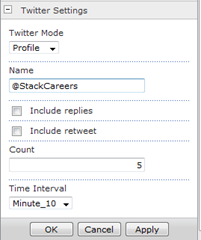
3- Click on Edit Web Part and go to Twitter Settings Section

image

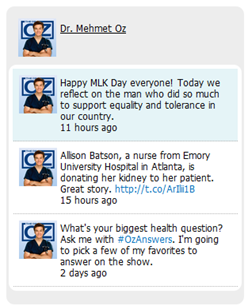
Let us select Profile as Twitter Mode and in the name let us type Dr oz account @DrOz and Count will be 3.

Click ok to close web part panel and save the page then you will find the following results

image

Now Let us change the mode to Search and select SharePoint 2010 as a name of this Search.

image

References

I hope you like this web part and really appreciate your comments and feedback

Regards.

 
13 Comments

Posted by on January 17, 2012 in SharePoint


Tags: , , , ,

SharePoint 2010 – How to use Audio and Video Webpart


Video and Audio Web Part [a.k.a Media Web Part] is one of the new cool web parts in SharePoint 2010, so in this article I am going to show you the way to add this web part in your page.
To add Media web part to the page you must activate those two features
1- SharePoint Server Publishing Infrastructure Feature in Site Collection features

2- SharePoint Server Publishing Feature in Site features

After that edit page then click on Insert tab in SharePoint Ribbon then select Video and Audio

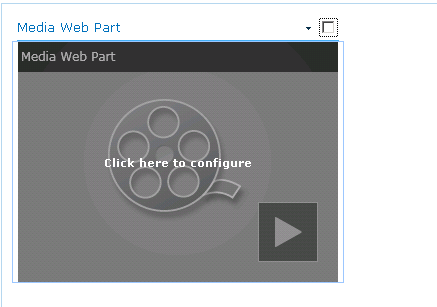
Now the Media Web Part in the page


Click on the Media Web Part and you will find Options Tab in the Ribbon

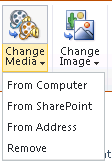
As you can see in the Options tab there are Chang Media button allow you to select the video and Chang Image button to change the image of web part and Styles (Dark, Light)
Click on Change Media to select the Media file.

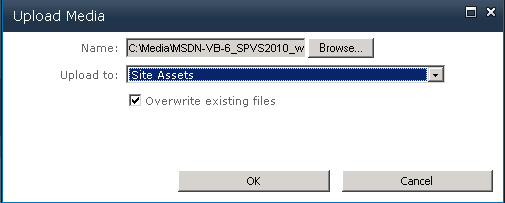
From Computer opens up the Upload media so you can upload the video and display it.

Once you click ok and saving the page. Click on play button and enjoy tour video

 
13 Comments

Posted by on November 8, 2010 in SharePoint


Tags: , , , ,

Creating Custom Timer Job in SharePoint 2010


In this post I will show you how to create Custom Timer Job in SharePoint 2010 but you must know this post is based on Creating Custom SharePoint Timer Jobs ,
Update [12/11/2011]
[
You can download the source code of this article from the following code (Please do not forget to rate it)
You do not need any things else just open it in Visual Studio 2010 and deploy it.That’s all
]
So let us start
Create Custom List and name it  ListTimerJob
Open Visual Studio 2010 >File > New >Project >SharePoint 2010>Empty SharePoint Project. >Name it Custom_TimerJob>Ok

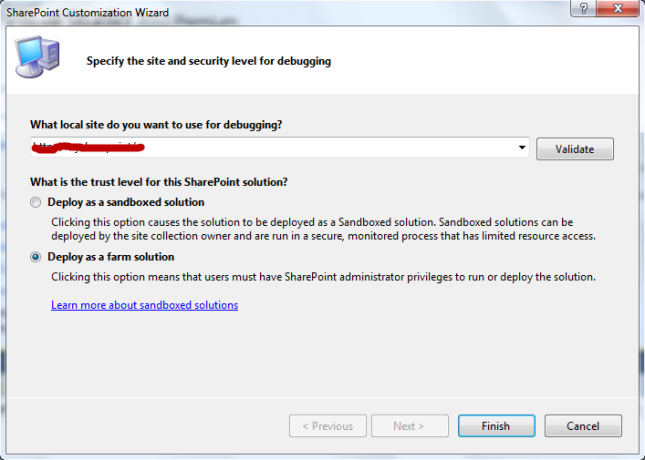
Check Deploy as farm solution>Finish

create a class that inherits from the Microsoft.SharePoint.Administration.SPJobDefinition class. To implement this class, you need to create a few constructors and override the Execute() method as following
namespace DotnetFinder
{
    class ListTimerJob : SPJobDefinition
    {
         public ListTimerJob()

            : base()
        {

        }

        public ListTimerJob(string jobName, SPService service, SPServer server, SPJobLockType targetType)

            : base(jobName, service, server, targetType)
        {

        }

        public ListTimerJob(string jobName, SPWebApplication webApplication)

            : base(jobName, webApplication, null, SPJobLockType.ContentDatabase)
        {

            this.Title = "List Timer Job";

        }

        public override void Execute(Guid contentDbId)
        {

            // get a reference to the current site collection's content database

            SPWebApplication webApplication = this.Parent as SPWebApplication;

            SPContentDatabase contentDb = webApplication.ContentDatabases[contentDbId];

            // get a reference to the "ListTimerJob" list in the RootWeb of the first site collection in the content database

            SPList Listjob = contentDb.Sites[0].RootWeb.Lists["ListTimerJob"];

            // create a new list Item, set the Title to the current day/time, and update the item

            SPListItem newList = Listjob.Items.Add();

            newList["Title"] = DateTime.Now.ToString();

            newList.Update();

        }
}
}

As you can see this job just add a new item to a ListTimerJob list every time it’s executed

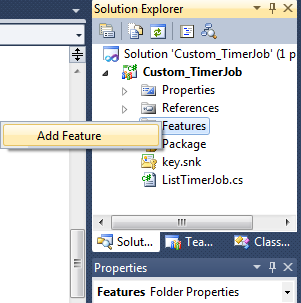
Now that you have the job built> Right click on the Features >Add Feature

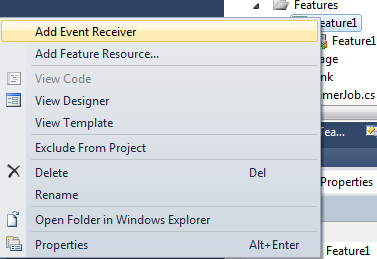
Right click on the Feature1 ” you can rename the Feature1 to any name” > Add Event Receiver

As you can see the event Receiver class inherits from the Microsoft.SharePoint.SPFeatureReceiver and This class handles events raised during feature activation, deactivation, installation, uninstallation, and upgrade. But we only need FeatureActivated & FeatureDeactivated event handler to install/uninstall our custom timer job as following

namespace DotnetFinder.Features.Feature1
{
[Guid("9a724fdb-e423-4232-9626-0cffc53fb74b")]
public class Feature1EventReceiver : SPFeatureReceiver
    {
        const string List_JOB_NAME = "ListLogger";
        // Uncomment the method below to handle the event raised after a feature has been activated.

        public override void FeatureActivated(SPFeatureReceiverProperties properties)
        {
            SPSite site = properties.Feature.Parent as SPSite;

            // make sure the job isn't already registered

            foreach (SPJobDefinition job in site.WebApplication.JobDefinitions)
            {

                if (job.Name == List_JOB_NAME)

                    job.Delete();

            }

            // install the job

            ListTimerJob listLoggerJob = new ListTimerJob(List_JOB_NAME, site.WebApplication);

            SPMinuteSchedule schedule = new SPMinuteSchedule();

            schedule.BeginSecond = 0;

            schedule.EndSecond = 59;

            schedule.Interval = 5;

            listLoggerJob.Schedule = schedule;

            listLoggerJob.Update();

        }

        // Uncomment the method below to handle the event raised before a feature is deactivated.

        public override void FeatureDeactivating(SPFeatureReceiverProperties properties)
        {
            SPSite site = properties.Feature.Parent as SPSite;

            // delete the job

            foreach (SPJobDefinition job in site.WebApplication.JobDefinitions)
            {

                if (job.Name == List_JOB_NAME)

                    job.Delete();

            }

}

   }

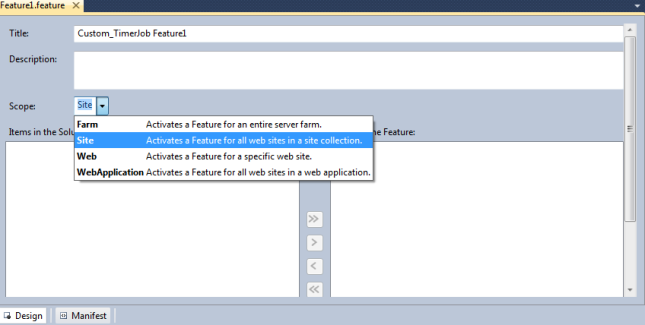
Before Deploying you should select the right scope of the Feature in other words in which scope you will activate the Feature(Farm,Site,Web,WebApplication) in our case we will activate Feature1 on Site which is mean Site Collection.

Note : if you trying to activate the feature in the wrong scope will get the following error

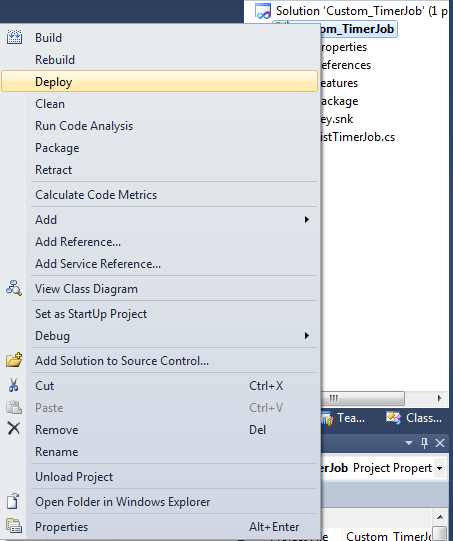
Now let us deploy our custom timer job >Right Click on Custom_TimerJob project > Click Deploy

Open now your SharePoint site and select ListTimerJob List and you should see something similar to the following image


Our custom timer job is working fine now you can go and check it and modify the schedule as following
Go to SharePoint 2010 central administration >Monitoring >in the Timer Jobs Section Select Review Job Definitions
and you should See our Custom Timer Job

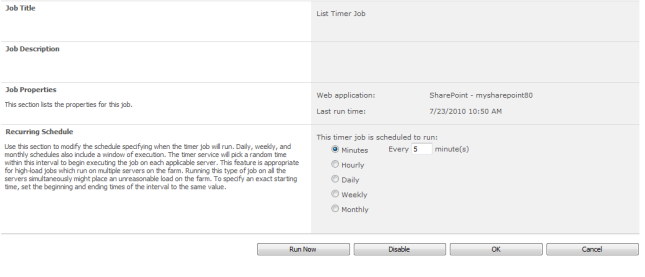
Click on it and you should see Edit Timer Job Page ,Modify Timer Job schedule based on your requirement
Note : you can also modify schedule of your custom Timer Job from the code but you need to add one of the following class in FeatureActviated Event Handler as following

After Specific Minutes use SPMinuteSchedule class
Hourly use SPHourlySchedule class
Daily use SPDailySchedule class
Weekly use SPWeeklySchedule class
Monthly use SPMonthlySchedule class

Updated [ 8/10/2011]
References
Regards.
 
139 Comments

Posted by on July 24, 2010 in SharePoint


Tags: , , , , , ,