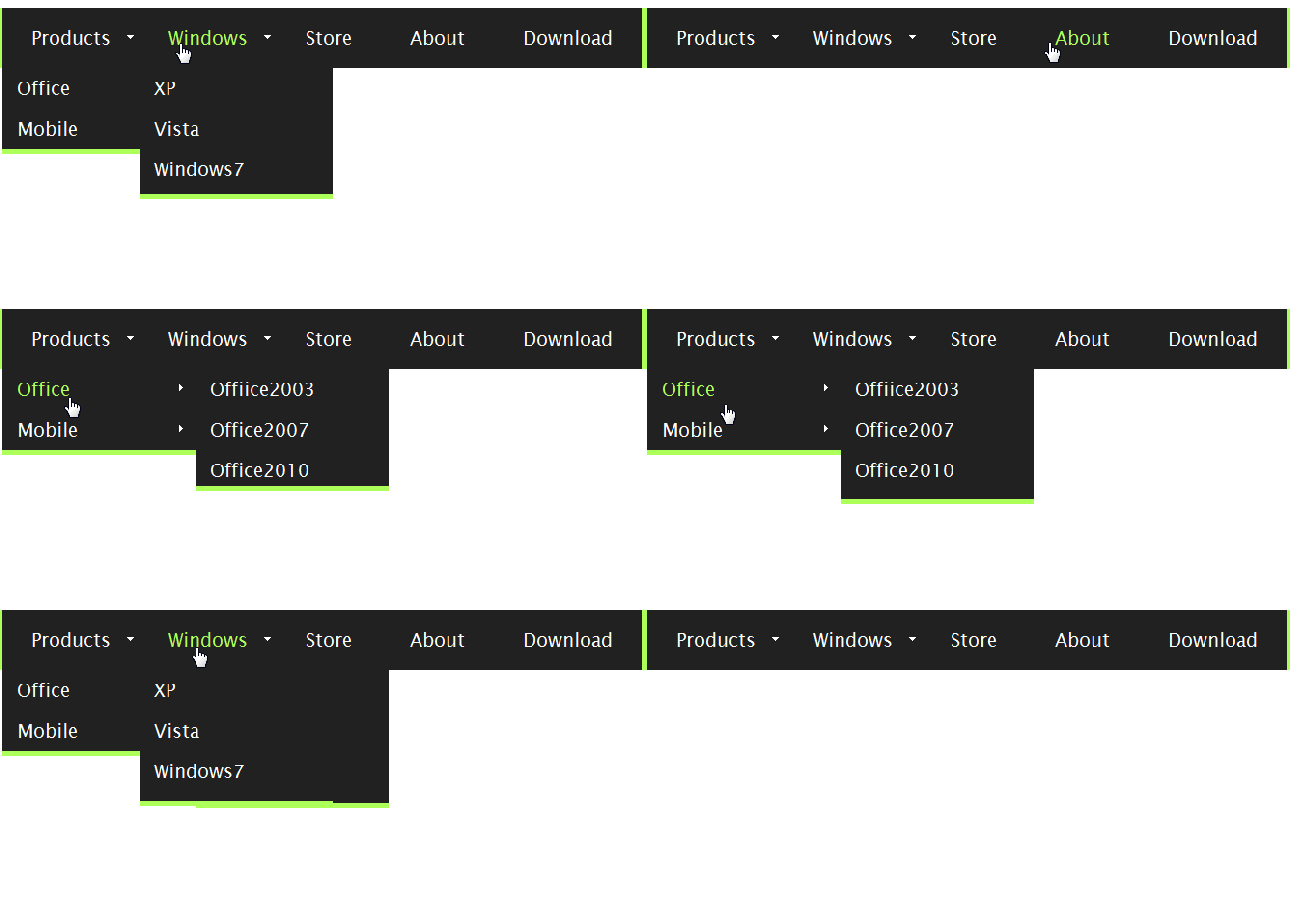
Click on the Image To see the Demo
Introduction
In this article I will show you how to build database driven hierarchical multi-column dropdown menus using SooperFish jquery Plugin. But why SooperFish Plugin ?
Feature of SooperFish PlugIn jquery
• Automatic dual or triple columns based on number of child menu items
• Optional delay before hiding menu on mouse-out
• Optional automatic indicator arrows (in black or white)
• Configurable show AND hide animations
• Custom easing supported
• Works with jQuery backlava plugin (optionally)
• Works fine with Javascript disabled
• Comes with several free themes to demonstrate styling
• 3.65kb uncompressed
• 2.01kb minified
To me the preceding feature very nice but why SooperFish
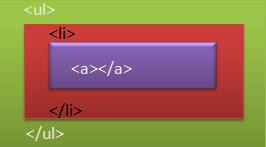
Because to build animated meun using SooperFish you need only three HTML Tags (ul,li and a), so that’s way I like very much SooperFish PlugIn .See image 2
Steps to build a Database Driven Hierarchical Menu using ASP.NET and SooperFish Jquery Plug in
Note: Thanks to Michael Libby for his nice article Building a Database Driven Hierarchical Menu using ASP.NET 2.0
Step 1 – create self-join Table and fill it with some data
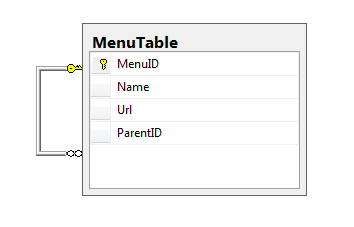
The simplest way to build hierarchical data is create self-join table which parent Menu and Child Menu in the same table .the child menu will use ParentID to establish a relationship with MenuID in parent Row
Figure 3: self-join Table
Fill the table with some data see –Figure 4
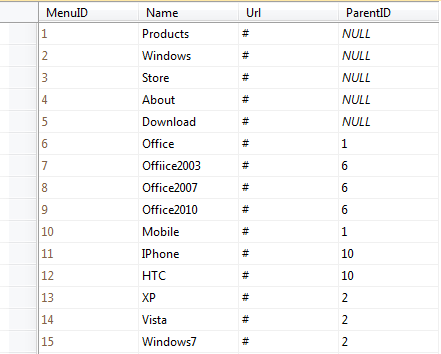
Figure 4 : Parent, Child Relationships
Step 2 : retrieve Data and Create Nested Relationship using DataSet
The DataSet() is perfect for retrieve the data and create relational data and convert it into xml format see the following code
public string GenerateXmlFormat()
    {
        string SqlCommand;
        DataSet DbMenu;
        DataRelation relation;

        using (SqlConnection conn = new SqlConnection(ConnectionString))
        {

            SqlCommand = "Select MenuID, Name,Url, ParentID from MenuTable";

            DbMenu = new DataSet();

            SqlDataAdapter Adapter = new SqlDataAdapter(SqlCommand, conn);

            Adapter.Fill(DbMenu);

            Adapter.Dispose();
        }

        DbMenu.DataSetName = "Menus";

        DbMenu.Tables[0].TableName = "Menu";

        //create Relation Parent and Child
        relation = new DataRelation("ParentChild", DbMenu.Tables["Menu"].Columns["MenuID"], DbMenu.Tables["Menu"].Columns["ParentID"], true);

        relation.Nested = true;

        DbMenu.Relations.Add(relation);

        return DbMenu.GetXml();
    }
The most important points in the previous code are
• The DataRelation Class, which allow you to create relation between Parent and Child Column.
• Nested property ,which allow you to build Hierarchical data .
• GetXml() function ,represent the retrieved data as xml format.
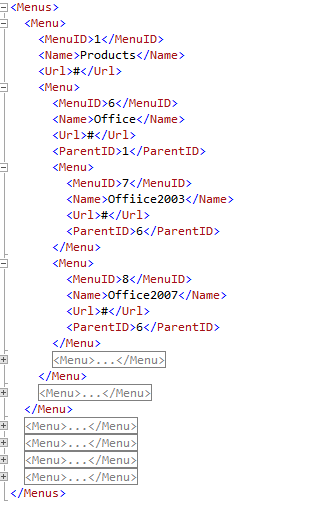
The result after calling DbMenu.GetXml() shown in the next Figure
Figure 5 : Hierarchical data in Xml Format after calling GetXml() method.
Step 3 – using XSLT to convert XML data to HTML format
After generating data as xml (Figure 5) we need to convert this XML or reformate it to HTML Markups .So we need an XSLT to convert xml format to HTML .
First of all create new XSLT file and then write this code
<!-- Find the root node called Menus then convert it to <UL> </UL> HTMLTags
       and call MenuListing for its children -->
  <xsl:template match="/Menus">
    <ul>
      <xsl:attribute name="class">
        <xsl:text>sf-menu</xsl:text>
      </xsl:attribute>
      <xsl:attribute name="id">
        <xsl:text>nav</xsl:text>
      </xsl:attribute>
      <xsl:call-template name="MenuListing" />
    </ul>
  </xsl:template>

  <!-- Allow for recusive child node processing -->
  <xsl:template name="MenuListing">
    <xsl:apply-templates select="Menu" />
  </xsl:template>

  <xsl:template match="Menu">
    <li>
      <a>
      <!-- Convert Menu child elements to <li> <a> html tags  and attributes inside a tag -->
      <xsl:attribute name="href">
        <xsl:value-of select="Url"/>
      </xsl:attribute>
        <xsl:value-of select="Name"/>
      </a>
      <!-- Recursively call MenuListing for child menu nodes -->

      <xsl:if test="count(Menu) > 0">
        <ul>
        <xsl:call-template name="MenuListing" />
        </ul>
      </xsl:if>
    </li>
  </xsl:template>
</xsl:stylesheet>
The XSLT code will do the following
1.Find the root Node Called Menus and convert it to ul tags with 2 attributes class name and id (class will be used by SooperFish PlugIn and ID important for stylesheet).
2.Call MenuListing Template for nested or children Menu
3.Find the node Called Menu and convert it to li and a html tags with href attribute for a tag with Name or title (the value of href attribute come from Url node and same thing with title for a).
4.Recursively call MenuListing for child menu node but the most important thing we add <ul> tag before Calling MenuListing Template
Now the result will be as following
<ul class="sf-menu" id="nav">
      <li>
          <a href="#">Products</a>
            <ul>
             <li>
              <a href="#">Office</a>
            <ul>
                 <li>
                   <a href="#">Offiice2003</a>
                 </li>
                 <li>
                   <a href="#">Office2007</a>
                 </li>
                  <li>
                   <a href="#">Office2010</a>
                  </li>
           </ul>
     </li>
....
....
</ul>
Step 4 – Convert XML to HTML using XSLT in ASP.NET
To apply XSLT transformation we need an XML data returned by the GenertateXmlFormat() Method also we need an XSLT file after that we will convert XML TO HTML Format and return the new format as string
public string ExecuteXSLTransformation()
    {
        string HtmlTags,XsltPath;
        MemoryStream DataStream = default(MemoryStream);
        StreamReader streamReader = default(StreamReader);

        try
        {
            //Path of XSLT file
            XsltPath = HttpContext.Current.Server.MapPath("XsltFormatFolder/TransformXSLT.xsl");

            //Encode all Xml format string to bytes
            byte[] bytes = Encoding.ASCII.GetBytes(GenerateXmlFormat());

            DataStream = new MemoryStream(bytes);

            //Create Xmlreader from memory stream

            XmlReader reader = XmlReader.Create(DataStream);

            // Load the XML
            XPathDocument document = new XPathDocument(reader);

            XslCompiledTransform XsltFormat = new XslCompiledTransform();

            // Load the style sheet.
            XsltFormat.Load(XsltPath);

            DataStream = new MemoryStream();

            XmlTextWriter writer = new XmlTextWriter(DataStream, Encoding.ASCII);

            //Apply transformation from xml format to html format and save it in xmltextwriter
            XsltFormat.Transform(document, writer);

            streamReader = new StreamReader(DataStream);

            DataStream.Position = 0;

            HtmlTags = streamReader.ReadToEnd();

            return HtmlTags;
        }
        catch (Exception ex)
        {
            ErrorMsg = ex.Message;
            return ErrorMsg;
        }
        finally
        {
            //Release the resources

            streamReader.Close();

            DataStream.Close();
        }

    }
Step 5 –Tied everything together
We are now in the last step ,we need just to add new aspx page and add the necessary jquery files including SooperFish Plugin and style sheet files as following
<link rel="stylesheet" type="text/css" href="Styles/sooperfish.css" media="screen"/>

<link rel="stylesheet" type="text/css" href="Styles/sooperfish-theme-large.css" media="screen"/>

<script type="text/javascript" src="Jquery/jquery-1.4.2.min.js"></script>

<script type="text/javascript" src="Jquery/jquery.easing-sooper.js"></script>

<script type="text/javascript" src="Jquery/jquery.sooperfish.js"></script>
    <script type="text/javascript">
        $(document).ready(function () {
            $('ul.sf-menu').sooperfish();
        });
    </script>
After that add Literal control in your page and assign html format programmatically Page_Load as following
if (!IsPostBack)
 {
 SooperFish spoorfishMenu = new SooperFish();
 Literal1.Text = spoorfishMenu.ExecuteXSLTransformation();
 }
Advance SooperFish effects
SooperFish Allow you to animate your menu in many different ways see the following code
<script type="text/javascript">
    $(document).ready(function() {
      $('ul.sf-menu').sooperfish({
    dualColumn  : 6, //if a submenu has at least this many items it will be divided in 2 columns
    tripleColumn  : 8, //if a submenu has at least this many items it will be divided in 3 columns
    hoverClass  : 'sfHover',
    delay    : 500, //make sure menus only disappear when intended, 500ms is advised by Jacob Nielsen
    animationShow  : {width:'show',height:'show',opacity:'show'},
    speedShow    : 750,
    easingShow      : 'easeOutBounce',
    animationHide  : {width:'hide',height:'hide',opacity:'hide'},
    speedHide    : 300,
    easingHide      : 'easeInOvershoot',
    autoArrows  : true
      });
    });
    </script>
aslo when you download the plugin files you will find two more stylsheet with some html pages show you some other effects
Note : you can know more about SooperFish here SooperFish Multi-Column Animated Drop-down
Download
Summary
This article show you how to build nice menus using SooperFish Jequery Plugin instead of using normal asp.net menu which generate table tags .All you have to do is create self-join table and generate xml using DataSet() after that convert it to html (ul,li and a) tags using XSLT.
Fill free to tell me about AspSooperFishMenu
References
Building a Database Driven Hierarchical Menu using ASP.NET 2.0
